
This is the continuation of the article Bootstrap with ASP.NET MVC 4 – Step by Step – Without NuGet Package. Here is the sample source code for the files _Layout.cshtml, Index.cshtml and HomeContainer.cs, which I’ve modified and created for the step by step instruction.
Use this code and follow the step by step instructions explained in Bootstrap with ASP.NET MVC 4 – Step by Step – Without NuGet Package.
Sample Source Code of BundleConfig.cs: (Download BundleConfig.cs)
using System.Web;
using System.Web.Optimization;

namespace MyTecBits_Bootstrap_MVC
{
    public class BundleConfig
    {

        public static void RegisterBundles(BundleCollection bundles)
        {
            bundles.IgnoreList.Clear();

            bundles.Add(new ScriptBundle("~/bundles/jquery").Include(
                        "~/Scripts/jquery-{version}.js"));

            bundles.Add(new ScriptBundle("~/bundles/bootstrapjs").Include(
                        "~/Scripts/bootstrap.min.js"));

            bundles.Add(new StyleBundle("~/Content/bootstrapcss").Include(
                        "~/Content/bootstrap.min.css",
                        "~/Content/bootstrap-responsive.min.css"));
        }
    }
}
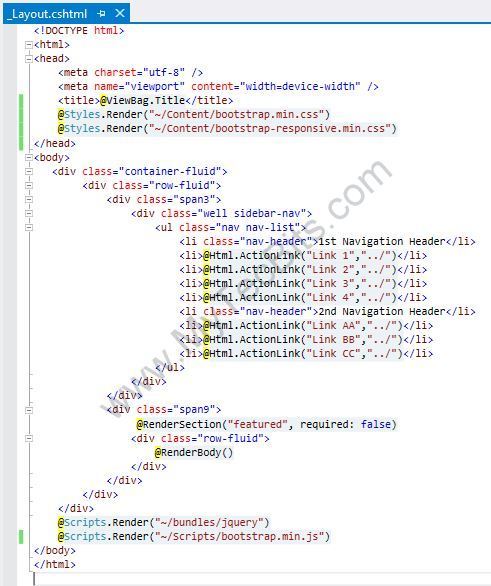
Sample Source Code of _Layout.cshtml: (Download _Layout.cshtml)
<!--<span class="hiddenSpellError" pre=""-->DOCTYPE html>
<html>
<head>
 <meta charset="utf-8" />
 <meta name="viewport" content="width=device-width" />
 <title>@ViewBag.Title</title>
 @Styles.Render("~/Content/bootstrapcss")
</head>
<body>
 <div class="container-fluid">
 <div class="row-fluid">
 <div class="span3">
 <div class="well sidebar-nav">
 <ul class="nav nav-list">
 <li class="nav-header">1st Navigation Header</li>
 <li>@Html.ActionLink("Link 1","../")</li>
 <li>@Html.ActionLink("Link 2","../")</li>
 <li>@Html.ActionLink("Link 3","../")</li>
 <li>@Html.ActionLink("Link 4","../")</li>
 <li class="nav-header">2nd Navigation Header</li>
 <li>@Html.ActionLink("Link AA","../")</li>
 <li>@Html.ActionLink("Link BB","../")</li>
 <li>@Html.ActionLink("Link CC","../")</li>
 </ul>
 </div>
 </div>
 <div class="span9">
 @RenderSection("featured", required: false)
 <div class="row-fluid">
 @RenderBody()
 </div>
 </div>
 </div>
 </div>
 @Scripts.Render("~/bundles/jquery")
 @Scripts.Render("~/bundles/bootstrapjs")
</body>
</html>
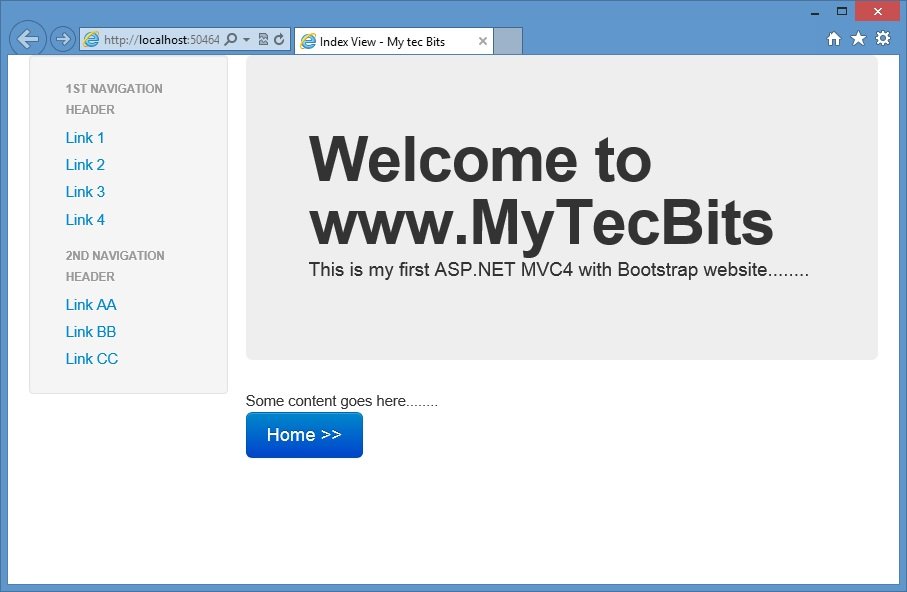
Sample Source Code of view file Index.cshtml: (Download Index.cshtml)
@{
 ViewBag.Title = "Index View - My tec Bits";
}
@section featured {
 <div class="hero-unit">
 <h1>Welcome to www.MyTecBits.com</h1>
 <p>This is my first ASP.NET MVC4 with Bootstrap website........</p>
 </div>
}
Some content goes here........
@Html.ActionLink("Home >>","../", null,new { @class="btn btn-primary btn-large" })
Sample Source Code of Controller File HomeController.cs: (Download HomeController.cs)
using System;
using System.Collections.Generic;
using System.Linq;
using System.Web;
using System.Web.Mvc;

namespace MyTecBits_Bootstrap_MVC.Controllers
{
 public class HomeController : Controller
 {
 //
 // GET: /Home/

public ActionResult Index()
 {
 return View();
 }

}
}
Instructions for using the above sample source code is explained in Bootstrap with ASP.NET MVC 4 – Step by Step – Without NuGet Package.
thx for the tutorial…but how cai i add another page to link 1
Hi,
For creating another page (view) follow the steps 35 to 37 in http://www.mytecbits.com/microsoft/dot-net/bootstrap-with-asp-net-mvc-4-step-by-step. Just change the view name from index to something else and change the the anchor tag of link 1 to point the new view.
I can’t make it work with IE 9. Is anybody having similar issues?
I found the solution. Some posts were suggesting putting
at the top but that didn’t actually fix it. The thing that fixed it was:
So here is the top of the final version of my _Layout.cshtml:
@ViewBag.Title
awesome..thanks 🙂
this is good tutorial 🙂