Back in the days (SQL Server 2014 and before) while designing database and developing tables, we used to create a separate log table to maintain the version history of a sensitive table. In addition, we have to create triggers to insert a record to the log table whenever there is a modification in the main table. Nowadays (from SQL Server 2016) Microsoft introduced the functionality of temporal table otherwise called as system-versioned table to take care of the version history of the data in the table in an automated way.
A system-versioned temporal table has a pair of tables called the current table and the history table. As the name suggests the current table will have the current data and the history table will have the log of all the modifications done to the data. Both the tables will have a pair of datetime2 columns one for validity start time and another for validity end time. The system uses these columns to store the validity time period of the row.
For example, when you insert a record in the current table by setting default for the period columns, the system will set the current date and time (say 2020-01-01 01:10:00.120852) to the validity start time column and sets an endless time (9999-12-31 23:59:59.9999999) to the validity end time column. When you update the same record, the system will insert a new record in the history table with the existing data from the current table along with its validity end time value as the current date time. In the current table, along with the update changes the date and time in the validity start time column is updated with the edited time. Now, let us see how to create a temporal table and use it.
Creating a temporal table
There are three methods for creating system versioned temporal table. We will see these methods one by one.
1. Creating temporal table without specifying a name of the history table
In this method, while creating the table, system creates a history table along with the current table with some auto generated name. Here is a sample script for creating the temporal table.
CREATE TABLE People
(
    PeopleID INT NOT NULL PRIMARY KEY
  , FirstName VARCHAR(50) NOT NULL
  , MiddleName VARCHAR(50) NOT NULL
  , LastName VARCHAR(50) NOT NULL
  , Address VARCHAR(250) NOT NULL
  , PeriodStartTime DATETIME2 GENERATED ALWAYS AS ROW START NOT NULL
  , PeriodEndTime DATETIME2 GENERATED ALWAYS AS ROW END NOT NULL
  , PERIOD FOR SYSTEM_TIME (PeriodStartTime, PeriodEndTime)
)
WITH (SYSTEM_VERSIONING = ON);
In the above table definition, PeriodStartTime is the validity start time column and PeriodEndTime is the validity end time column. These columns are defined as validity start and end column in PERIOD FOR SYSTEM_TIME. To activate the system versioning set parameter SYSTEM_VERSIONING = ON.
The validity start and end columns should be of datatype DATETIME2 and defined with GENERATED ALWAYS AS ROW START and GENERATED ALWAYS AS ROW END. Both these columns should be a NOT NULL column. The key PERIOD FOR SYSTEM_TIME should define these columns.
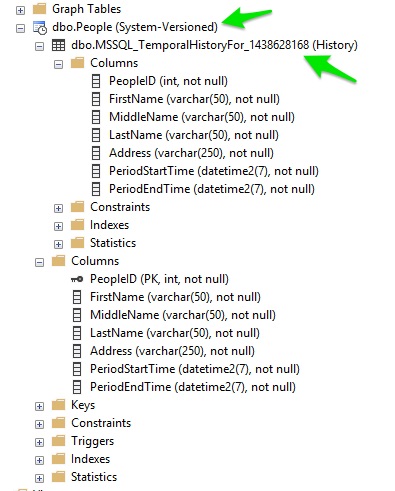
The table created by this method has a system created name for the history table. Below image shows the tables created using the above script. The icon of the system versioned table is represented by a clock and the table name is suffixed with (System-Versioned). Here the system generated history table is dbo.MSSQL_TemporalHistoryFor_1438628168 and it is suffixed with (History).

2. Creating temporal table by specifying a name to the history table
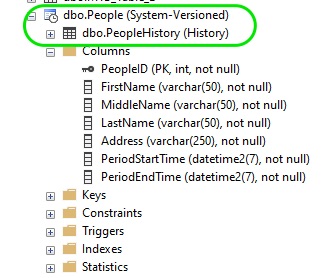
In this method, in the table creation script, along with the current table’s schema, you have to specify the name of the history table. The system will use this name and uses the schema of the current table to create the history table. This method will be good for maintaining a uniform naming conversion for all the tables. Let us see an example script.
CREATE TABLE People
(
    PeopleID INT NOT NULL PRIMARY KEY
  , FirstName VARCHAR(50) NOT NULL
  , MiddleName VARCHAR(50) NOT NULL
  , LastName VARCHAR(50) NOT NULL
  , Address VARCHAR(250) NOT NULL
  , PeriodStartTime DATETIME2 GENERATED ALWAYS AS ROW START NOT NULL
  , PeriodEndTime DATETIME2 GENERATED ALWAYS AS ROW END NOT NULL
  , PERIOD FOR SYSTEM_TIME (PeriodStartTime,PeriodEndTime)
)
WITH (SYSTEM_VERSIONING = ON (HISTORY_TABLE = dbo.PeopleHistory));
In the above table definition, you have to specify the name of the history table in HISTORY_TABLE parameter. Apart from this minor difference, the table definition is exactly the same as the previous method (creating temporal table without a history table name).

3. Migrating existing tables to temporal table
This method will be helpful, if you want to convert the classic table set along with triggers to maintain the version history to the new built-in temporal system. Here are the steps involved to migrate existing tables to temporal table:
- Drop the triggers used for versioning in classic tables.
- Alter the current (main) table and add a pair of datetime2 columns one for validity start time and another for validity end time. (NOTE: if these columns exist, make sure they are not-nullable)
- Alter the history table add a pair of datetime2 columns. (NOTE: if these columns exist, make sure they are not-nullable)
- Alter the current table and add validity start and end column in PERIOD FOR SYSTEM_TIME.
- Alter the current table and switch on SYSTEM_VERSIONING, specify history table in HISTORY_TABLE parameter and switch on DATA_CONSISTENCY_CHECK.
Here is a sample script, considering that the current / main table is People, history table is PeopleHistory and the trigger name is People_OnUpdateDelete.
/* Drop trigger */
DROP TRIGGER People_OnUpdateDelete;

/* Alter the current table to make the validity start and end time columns as datetime2 and not nullable */
ALTER TABLE People ALTER COLUMN [PeriodStartTime] datetime2 NOT NULL;
ALTER TABLE People ALTER COLUMN [PeriodEndTime] datetime2 NOT NULL;

/* Alter the history table to make the validity start and end time columns as datetime2 and not nullable */
ALTER TABLE PeopleHistory ALTER COLUMN [PeriodStartTime] datetime2 NOT NULL;
ALTER TABLE PeopleHistory ALTER COLUMN [PeriodEndTime] datetime2 NOT NULL;

/* In current table add PERIOD FOR SYSTEM_TIME parameter */
ALTER TABLE People
    ADD PERIOD FOR SYSTEM_TIME ([PeriodStartTime], [PeriodEndTime])

/* In current table add parameters SYSTEM_VERSIONING, HISTORY_TABLE and DATA_CONSISTENCY_CHECK */
ALTER TABLE People
    SET (SYSTEM_VERSIONING = ON (HISTORY_TABLE = dbo.PeopleHistory, DATA_CONSISTENCY_CHECK = ON));
Modifying data
As the temporal table is created, you can now play around by inserting, updating and deleting records in it. Modifying data in the temporal table is done by the regular DML statements like INSERT, UPDATE and DELETE statements. The only difference is that the version start and end period columns cannot be modified directly. Also, history table data cannot be updated directly when the system versioning parameter is in ON state.
Inserting data
While inserting records in the temporal table, you have to consider the version start and end period columns. You cannot directly enter a date and time in these columns, instead, you have to mention default for these columns. Here is an example:
INSERT INTO People
	VALUES (1, 'Aadam', 'S', 'Smith', 'Melbourne, Australia', default, default)
GO
However, you do not need to specify default and ignore the period columns, if you choose to specify the column names in the INSERT statement. Here is an example:
INSERT INTO People
	(PeopleID, FirstName, MiddleName, LastName, Address)
	VALUES (2, 'John', 'D', 'Rhodes', 'Sydney, Australia')
GO
Updating data
While updating data in the temporal table, you have to keep in mind that the version start and end period columns cannot be modified directly. Also, history table data cannot be updated directly when the system versioning parameter is in ON state.
Updating data in the current table
Updating data in the current table is straight forward with just using the UPDATE statement. Here is an example.
UPDATE People SET FirstName = 'Jhonson' WHERE PeopleID = 2
GO

UPDATE People SET Address = 'Brisbane, Australia' WHERE PeopleID = 3
GO
Updating data from history table to current table
Occasionally, you may get requests to roll back the update done on specific records to a good version from the history table. In such situations, you can use FOR SYSTEM AS OF temporal sub-clause to revert back the changes. In the below given example, a specific record in the current table (People) is reverted back to a version from history table (PeopleHistory) as of 2020-03-13.
UPDATE People
SET
	FirstName = History.FirstName
FROM
	People
FOR
	SYSTEM_TIME AS OF '2020-03-15' AS History
WHERE
	History.PeopleID = 2
	AND People.PeopleID = 2 ;
GO
Updating data in the history table
Usually, you may never need to update the data in the history table. Updating the history table is not a good practice and it will defeat the concept of versioning. However, it is possible to update the records in the history table by setting SYSTEM_VERSIONING = OFF. While the system versioning is set off, the system will not monitor and log any modification done in the current table or the history table.
Deleting data
You can use the regular DELETE statement to delete records from the the current table. However, just like UPDATE, you cannot delete the records from the history table when SYSTEM_VERSIONING is in ON state.
Querying data
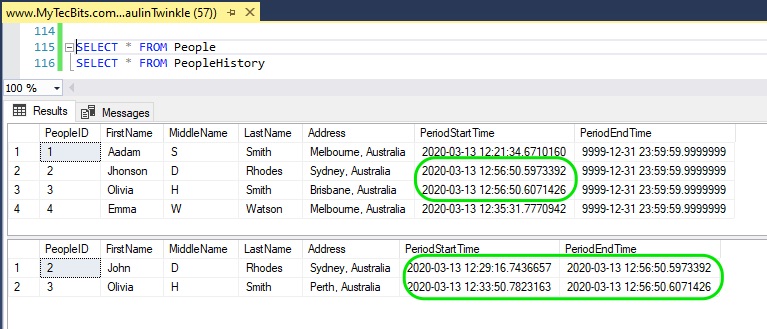
So far you have seen adding and modifying data in system versioned temporal table. Now you will see how to query and fetch the historical data form it. If you just use SELECT * FROM against the current table or history table, you will see data like this:

Getting version history of a specific row
If you want to get all the history of a specific record in the current table, then use FOR SYSTEM_TIME ALL sub-clause to get the data. here is an example:
SELECT *
FROM People
FOR SYSTEM_TIME ALL
WHERE PeopleID = 2
ORDER BY PeriodStartTime DESC
Alternatively, if you want to get the history of a specific current record within a specific period of time, then you can use the below temporal sub-clauses:
- BETWEEN – AND
- FROM – TO
- CONTAINED IN
Here are the examples on how to use the sub clauses:
/* Using BETWEEN - AND sub clause */
SELECT *
FROM People
FOR SYSTEM_TIME BETWEEN '2020-01-01' AND '2020-03-14'
WHERE PeopleID = 2
ORDER BY PeriodStartTime DESC

/* Using FROM - TO sub clause */
SELECT *
FROM People
FOR SYSTEM_TIME FROM '2020-01-01' TO '2020-03-14'
WHERE PeopleID = 2
ORDER BY PeriodStartTime DESC

/* Using CONTAINED IN sub clause */
SELECT *
FROM People
FOR SYSTEM_TIME CONTAINED IN ('2020-01-01', '2020-03-14')
WHERE PeopleID = 2
ORDER BY PeriodStartTime DESC
Getting version of data at a specific time
In some situation you want to find the state of a record at a specific past date and time. In such situation, you have to use the AS OF temporal sub clause. Below is an example:
SELECT *
FROM People
FOR SYSTEM_TIME AS OF '2020-03-13 T13:23:40'
WHERE PeopleID = 2
ORDER BY PeriodStartTime DESC
This AS OF sub-clause, returns a single record if history exists, showing the state of the data at the specified date and time.
Dropping temporal table
You cannot drop a temporal table like a regular table. If you right-click a temporal table in SSMS, you cannot find the delete option in the context menu. Even if you try to drop the table using a drop script, you will get an error.
DROP TABLE People

/* Result */
Msg 13552, Level 16, State 1, Line 20
Drop table operation failed on table 'Test.MyTecBits.com.dbo.People' because it is not a supported operation on system-versioned temporal tables.
For dropping or deleting a temporal table, you have to perform these steps:
- First alter the table and set off the system versioning.
- Then drop the current table.
- Finally drop the history table.
Here is the sample script to drop the People temporal table we have created at the beginning of this article.
/* Remove system versioning */
ALTER TABLE [dbo].[People] SET ( SYSTEM_VERSIONING = OFF  )
GO

/* Delete current table */
DROP TABLE [dbo].[People]
GO

/* Delete history table */
DROP TABLE [dbo].[MSSQL_TemporalHistoryFor_1438628168]
GO
Reference
- More about temporal tables at Microsoft Docs.
